 Email editor
 Follow-up manager
 Push notifications
 SMS module
 Layered database
 Native integrations
 Testing mailings
 REST API/Webhooks
 Website forms
 Website crawler
 Coupons

OAuth authentication
The authentication system of the Copernica REST API uses OAuth2. This is a powerful and standardized protocol that is used by many websites and applications to control access to the API. The OAuth2 protocol makes a clear distinction between two different aspects of API access: (1) applications that have access to the REST API, and (2) the list of accounts to which each registered application has access.
Because we use this OAuth2 protocol, you need to take two steps to get access to the API: you first have to register your website of app with Copernica, and then you have to give your application access to your account. After you've taken these two steps (which you can do both via the www.copernica.com dashboard) you will be handed an access key that you can use to access the REST API.
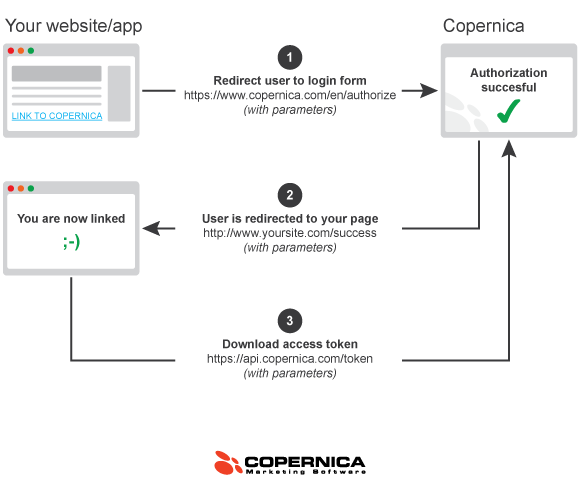
But you can do more with the OAuth2 than just fetching an access key to access your own account. You probably are already familiar with OAuth2, because it is used by many different websites. For example, the "log in with Facebook" buttons that you find all over the internet are based on this protocol too. When you click on such a button, you are automatically redirected to Facebook where a text is displayed like "Website X wants access to your email address, contact list, et cetera. Is that OK with you?". After you have confirmed this access you are redirected back to the original website, which now has access to your Facebook profile. A similar thing can be done with Copernica.
Do you actually need this?
Before you continue reading this article, you must first wonder whether you need this feature in the first place. If all you need is API access to retrieve and update data in your own account, you probably don't. All you need then is the single access key that can be fetched from the dashboard. This is sufficient for the vast majority of Copernica users.
The OAuth2 protocol only makes sense if you have an application that you want to connect to many different accounts - events to accounts that do not even belong to you. Imagine for example that you build a website that uses artificial intelligence to analyze Copernica-databases and that optimizes selections. This tool is not only useful for yourself, but of great value for others too. You can add a button to this website: "click here to analyze your own database". If someone clicks this button he is redirected to Copernica.com where he gets a question like "the database-analyzer wants access to your account to analyze your database. Do you want to give this access?". If the user allows this access, he is redirected back to your website, and from that moment on your website can fetch data from the Copernica account of that other user.
Registering your application
The very first step in setting up your own OAuth2 authorization button is registering your website or app with Copernica. You can do this via the dashboard op www.copernica.com. Ensure that the name and description of your application are clear and understandable, because this is the information that is displayed to users who click on the button. The application name and description will be included in the "application X wants access to your account" message on Copernica.com.
After you've registered your application, you will receive a client_key and client_secret. This is the login information of your application, and you need it when you're redirecting a user to Copernica.com. The client_secret variable must be kept secret, you should never give it to a user of your website, and use it only in calls to the Copernica REST API.
The button or hyperlink
You can create an authorization button or link on your website with the login data of your application (the client_key and client_secret variables). This button should be added to your website or app, and must have the following URL:
https://www.copernica.com/nl/authorize?client_id=XXX&redirect_uri=XXX&state=XXX&response_type=code
A number of variables in this URL are set to XXX and have to be replaced by other values.
- client_id: the value of the client_key of your application
- redirect_uri: the full address (url) of the page on your website to which the user should be redirected after he gave you access to his account
- state: a difficult to guess random string generated by yourself (you need a different value for every user that clicks the link!)
- response_type: this should be set to the value code
Do make sure that the state parameter is indeed hard to guess. If we do not like the string (too short, too predictable) we will not open up an accounts.
The return page
After you've added the button to your website, you must also make the return page. This is the page to which users return after they've clicked the button on your website and after they've given you access on the Copernica.com website. Copernica adds two parameters to the URL of this page: state and code.
You need to do two different things on the return page. First you must check whether the value of the state variable matches the random string that you had created. If this does not match, you should ignore the request because something strange is going on (abuse!).
If the state variable turns out to be OK, you can use the REST API to fetch the actual access key. You should send a HTTP GET request to the following URL:
https://api.copernica.com/v4/token?client_id=XXX&client_secret=XXX&redirect_uri=XXX&code=XXX
This address also contains a number of XXX parameters that have to set:
- client_id: should be set to the client_key of your application
- client_secret: should be set to the client_secret of your application
- redirect_uri: this should be the same address that you set in the link or button
- code: you should copy the code parameter that was added by Copernica to the redirect url
Remember that this URL is an address to the REST API. You should not give the URL to the user, and you also do not have to redirect to user to this address. Your server is supposed to make a HTTP GET request to this address to download the access key. The redirect_url parameter in the URL is not used. No user will be redirected to this URL. The only reason why you need to add this parameter is because we want to check that the access key retrieval comes from the expected source.
If all things work out, the HTTP GET call will give you a small JSON document containing an access_token. This is the token that you can then use to start making API calls on behalf of the user who gave you access to his account.
{ access_token : "ed430a95c58fd7d2830c9dc453396cf5" }